Steps to Integrate WooCommerce
Scope:
This document covers the standard operating procedures for using the eShipz Smart Dashboard to manage logistics operations, including carrier integration.
Purpose:
The purpose of this document is to guide users through the complete setup and operational workflow of the eShipz Smart Dashboard, ensuring efficient logistics management from a single platform.
Procedure and Steps
1. Login to the Dashboard
Purpose: To access the dashboard and begin using eShipz features.
Steps:
- Go to the eShipz Smart Dashboard login page (https://app.eshipz.com/login).
- Enter the email address shared with you via official communication.
- Enter the password provided in the same email.
- Click the Login button.
- Once logged in, you will be able to view the main dashboard containing order, shipment metrics, and reports.
2. Add a Contracted Carrier Partner
Purpose: To integrate third party logistics providers for shipping operations.
Steps:
- Click on the Settings tab.
- Navigate to the Carriers option.
- Click the plus icon to add a new carrier.
- Select the desired carrier from the list.
- Enter the required API credentials or authentication details.
Example: Selecting Bluedart >> Credentials
- Choose the label type based on preference.
- Upload your company logo.
- Agree to the terms and conditions.
- Click Validate and then Save.
- The carrier is now successfully added and ready for use.
3. Add and Sync Sales Channels
Purpose: To import orders from integrated sales platforms.
Steps:
- Click on the Settings tab.
- Go to the Sales Channel section.
- Select the sales channel you wish to connect.
- Select Woocommerce.
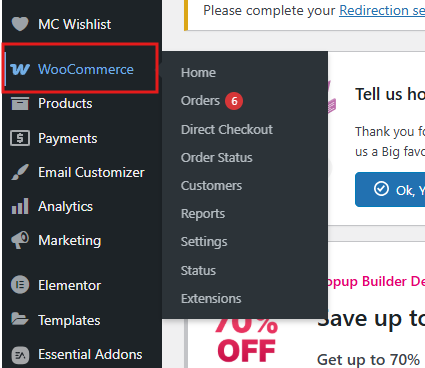
1: Login to woocommerce store and under dashboard click on woocommerce.
2: Click on settings.
3: Click on ADVANCED.
4: Click on REST API.
5: Click on Add Key.
6: Create a new key named "eShipz" with read and write permissions, then click on "Generate Key." A new consumer key and consumer secret will be generated.
7: Then go to eShipz account, copy and paste all the required details from woocommerce store: Store URL, Consumer secret, Consumer key, Status code and select the Woocommerce version as Wordpress(4.4 or later) Woocommerce(3.5.x or later). Once done click on save.
Sync and Ship Orders
Steps: Sync your Orders:
- Navigate to the Orders tab.
- Click on Un-shipped
- Click the Refresh icon to sync the latest orders.
Steps to Create Shipment:
- In the Orders tab go to Unshipped and then select the Order then click on Create Shipment.
- Enter additional shipment details if necessary.
- Click Fetch Services to retrieve shipping options.
- Select your preferred carrier.
- Click Book and Generate Label to confirm.
- Once the Label generated click on Download Label.
View Shipment Details
Steps:
- Navigate to the Shipments tab.
- Click on Forward to view the shipment details including weight and declared values.
Add Warehouse Address
Steps:
- Go to the Settings tab.
- Select Pick-Up Warehouses.
- Enter warehouse address and contact details.
- Click Save to store the information.
If you need help or encounter errors, send us an email at hello@eshipz.com as the support contact. Additionally you can create a ticket by your own Go to eShipz dashboard on right middle you will find
Help.
Related Articles
Steps to Integrate Magento
Scope: This document covers the standard operating procedures for using the eShipz Smart Dashboard to manage logistics operations, including carrier integration. Purpose: The purpose of this document is to guide users through the complete setup and ...Steps to Integrate Unicommerce
Scope: This document covers the standard operating procedures for using the eShipz Smart Dashboard to manage logistics operations, including carrier integration. Purpose: The purpose of this document is to guide users through the complete setup and ...eShipz Dashboard - Step by Step User Guide to Integrate shopify
Scope: This document covers the standard operating procedures for using the eShipz Dashboard to manage logistics operations, including carrier integration, order processing, shipment creation, customer communication settings, and reporting. Purpose: ...Define your Package size Setting
Purpose This SOP defines the standardized process for creating and saving custom package sizes within the eShipz. It ensures accuracy and consistency in package dimension entries to support proper rate calculation, carrier selection, and label ...Common Web App Errors and How to handle them?
Here is a list of common errors you may see when using a web application: 504 Gateway Timeout: This error occurs when a server acting as a gateway or proxy doesn't receive a timely response from another server it needs to access to fulfill your ...